spring boot에서는 OAuth2.0을 더욱 편리하게 구현할 수 있도록 도와주는 oauth2-client 라는 라이브러리가 존재한다. JDON의 카카오와 깃헙 로그인 기능을 구현하기 위해서 oauth2-client를 사용해보았다. 구현과정 렛츠고
[ 개발환경 ]
java 17
spring boot 3.3
spring security 6.2
spring security oauth2 client 6.2
oauth2 client
oauth2 client란 OAuth 2.0 서비스에 대한 인증을 처리하기 위한 모듈로 Spring Boot 프레임워크에서 OAuth 2.0 프로토콜을 사용하여 인증을 수행하는 클라이언트이다.
oauth2-client 를 사용하면 정말 간단하게 소셜 로그인을 뚝딱 구현할 수 있다.
간단한 oauth2-client 가이드
그래도... 뭔진 알고써야하니까...ㅎㅎ

우선 oauth2 client를 사용하려면 다음과 같이 oauth2-client 의존성을 추가해줘야한다.
Q. spring security없이 oauth2-client만 사용할 수 있나?
spring-boot-starter-oauth2-client 스타터는 Spring Security의 OAuth 2.0 지원을 포함하기 때문에 spring-security 의존성없이 oauth2-client만 사용할 수는 없다.
# ClientRegistration
oauth2-client는 인증을 요청할 OAuth2 제공 서버에 대한 정보를 ClientRegistration에 저장한다.

저장할 정보는 다음과 같다.
| registrationId | OAuth2 제공 서버의 고유 식별자 |
| clientId | OAuth 2.0 client-id |
| clientSecret | client의 비밀번호 |
| clientAuthenticationMethod | client 인증 방법 | 종류는 각 OAuth2 제공 서버의 레퍼런스를 보도록 하자. |
| AuthorizationGrantType | 사용할 OAuth 2.0 Grant Type | 여기서 설명했다. |
| redirectUri | OAuth2 제공 서버에서 인증 코드나 액세스 토큰을 보낼 때 사용할 리디렉션 URI |
| scopes | 액세스하고자 하는 리소스의 범위 |
| providerDetails | 공급자와 관련된 추가적인 정보 |
| clientName | client 이름 |
다음과 같이 application.yml을 통해서 필요한 정보를 등록할 수 있다.

근데 편리하게도 oauth2-client에서 기본으로 제공하는 서드파티 애플리케이션들이 있는데 세계적으로 유명한 서비스, Facebook, Github, Google, Microsoft 등과 같은 곳은 provider detail을 미리 저장해두고 있어 개별적으로 발급되는 registration 정보만 등록하면 된다. 깃헙 개이득ㅎ
# ClientRegistrationRepository
등록한 ClientRegistration 은 ClientRegistrationRepository에 저장되는데 기본적으로 제공되는 ClientRegistrationRepository는 InMemoryClientRegistrationRepository로 데이터를 인메모리에 저장되며 원한다면 다른 데이터베이스나 다른 형식으로 저장하도록 Overriding 하면 된다.
# SecurityFilterChain @Bean 등록
OAuth2는 단순 로그인을 통한 인증을 제공하는 것 뿐만 아니라 OAuth2를 제공하는 회사의 다른 자원, 서비스를 사용할 수 있는 권한을 얻기 위한 방법이고 로그인은 그 기능 중 하나라고 말했었다. 따라서 Login이 주목적이 아니라면 OAuth2LoginConfigurer 말고 다른 선택지도 있다.
OAuth2Login을 제공하고 싶다면 security filterChain에 oauth2Login()을,

Protected Resource에 접근하는 기능을 제공하고 싶다면 oauth2Client()를 등록하면 된다.
@Configuration
@EnableWebSecurity
public class SecurityConfig {

	@Bean
	public SecurityFilterChain securityFilterChain(HttpSecurity http) throws Exception {
		http.oauth2Client(Customizer.withDefaults());

		return http.build();
	}

}
그렇지만 OAuth2를 이용한 로그인 기능 구현에 대한 글이므로 이부분은 패스ㅡ
# baseUri
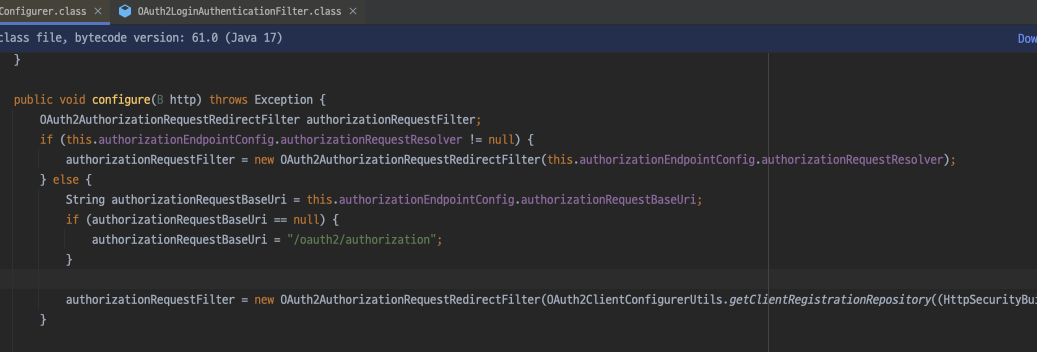
oauth2 에서 필요한 uri이 몇가지 있다. 각 필터에서 필요한 uri의 default 값이 있지만 나는 꼭 바꾸고 싶다!! 한다면 custom 할 수 있다.
해당 필더 configuration에서 baseUri를 사용하여 셋팅하면 된다.

설정할 수 있는 uri은 여러가지가 있지만 가장 흔히 언급되는 3가지 정도 정리해보겠다.
1. oauth2 로그인을 시작하는 base uri
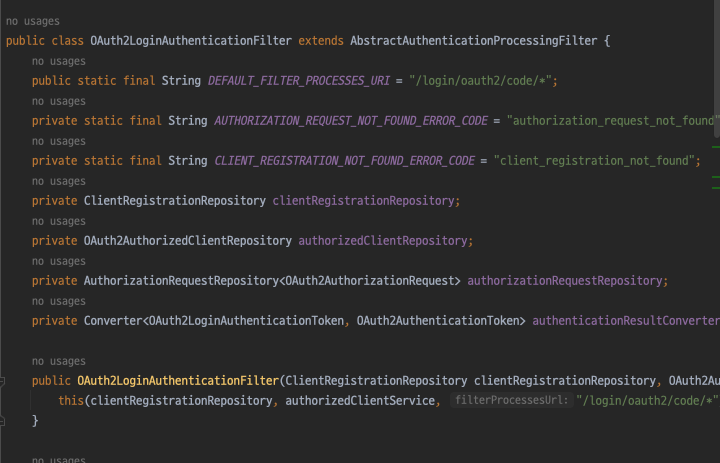
OAuth2LoginAuthenticationFilter에 default 값이 설정되어 있다.

그래서 별도 설정하지 않아도 http://localhost:8080/oauth2/authorization/kakao 으로 접속하면 kakao 로그인이 뜨게된다. 만일 로그인 시작의 uri을 바꾸고 싶다면
http.oauth2Login(config -> config
        .authorizationEndpoint(endpointConfig -> endpointConfig
                .baseUri("/oauth2/custom"))
이렇게 security config에서 oauth2Login 안에 설정하면 된다.
2. 인증 완료 후 인증 서버로부터 받은 응답을 처리할 특정 uri 패턴 (redirect uri)
OAuth2LoginAuthenticationFilter 에 정의되어 있다.

3. redirection으로 인증 응답하기 위한 uri
클라이언트가 OAuth 2.0 공급자에게 인증을 요청한 후, 공급자는 이 베이스 URI를 사용하여 인증 응답(일반적으로 인증 코드가 포함된 콜백)을 애플리케이션으로 리디렉션한다. 이 경로는 리디렉션 요청을 받고 처리하기 위한 엔드포인트를 정의하는 데 사용한다.
RedirectionEndpointConfig 클래스의 authorizationResponseBaseUri으로 설정하면 된다.
http.oauth2Login(config -> config
        .redirectionEndpoint(redirectConfig -> redirectConfig
                .baseUri("/oauth2/redirect/custom"))
## 참고
1. RedirectionEndpointConfig 클래스의 authorizationResponseBaseUri
이 필드는 OAuth 2.0 인증 프로세스 중 리디렉션 URI의 베이스 경로를 설정하는 데 사용됩니다. 클라이언트가 OAuth 2.0 공급자에게 인증을 요청한 후, 공급자는 이 베이스 URI를 사용하여 인증 응답(일반적으로 인증 코드가 포함된 콜백)을 애플리케이션으로 리디렉션합니다. 이 경로는 리디렉션 요청을 받고 처리하기 위한 엔드포인트를 정의하는 데 사용됩니다. 예를 들어, authorizationResponseBaseUri가 /oauth2/callback으로 설정된 경우, 모든 OAuth 2.0 공급자의 콜백 요청은 이 URI를 기반으로 처리됩니다.
2. OAuth2LoginAuthenticationFilter 클래스의 생성자
OAuth2LoginAuthenticationFilter는 Spring Security 필터 체인의 일부로, OAuth 2.0 로그인 플로우에서 인증 토큰을 교환하고 사용자 세션을 생성하는 역할을 합니다. 이 필터는 공급자로부터 리디렉션된 인증 응답을 처리하고, 필요한 인증 및 사용자 정보를 추출하여 시큐리티 컨텍스트에 설정합니다. 생성자에서 전달된 /login/oauth2/code/*는 이 필터가 처리할 URI 패턴을 나타냅니다. 예를 들어, Google이나 Facebook 같은 공급자로부터 인증 코드를 포함한 리디렉션 응답이 이 패턴에 매칭되는 URI로 들어오면, 이 필터가 그 요청을 처리합니다.
[ 쓰임새의 차이 ]
• authorizationResponseBaseUri:
• 인증 서버로부터의 콜백(리디렉션 응답)을 받을 베이스 URI를 정의합니다.
• 주로 URI 패턴을 설정하고, 해당 패턴에 대한 요청을 받아들일 위치를 애플리케이션에서 구성하는 데 사용됩니다.
• 리디렉션을 처리할 컨트롤러나 필터의 베이스 경로 역할을 합니다.
• OAuth2LoginAuthenticationFilter의 생성자에서의 URI 패턴:
• 인증 완료 후 인증 서버로부터 받은 응답을 처리할 특정 URI 패턴을 지정합니다.
• 이 필터는 해당 패턴을 사용하여 실제 인증 코드를 교환하고, 최종적으로 사용자 인증 정보를 세션에 등록하는 과정을 처리합니다.
• 인증 처리의 구체적인 실행을 담당합니다.
두 설정은 모두 OAuth 2.0 로그인 프로세스의 다른 부분에 초점을 맞추고 있으며, 각각 인증 프로세스의 시작과 끝에 관여합니다. authorizationResponseBaseUri는 리디렉션 응답의 시작점을 설정하는 반면, OAuth2LoginAuthenticationFilter는 그 응답을 받아 실제 사용자 인증을 완성하는 역할을 합니다.
아이거 redirection이랑 아닌거(아마도 forward) 이거이거 헷갈렸던건데 잊어먹고 있었다. 다시 찾아봐야함.
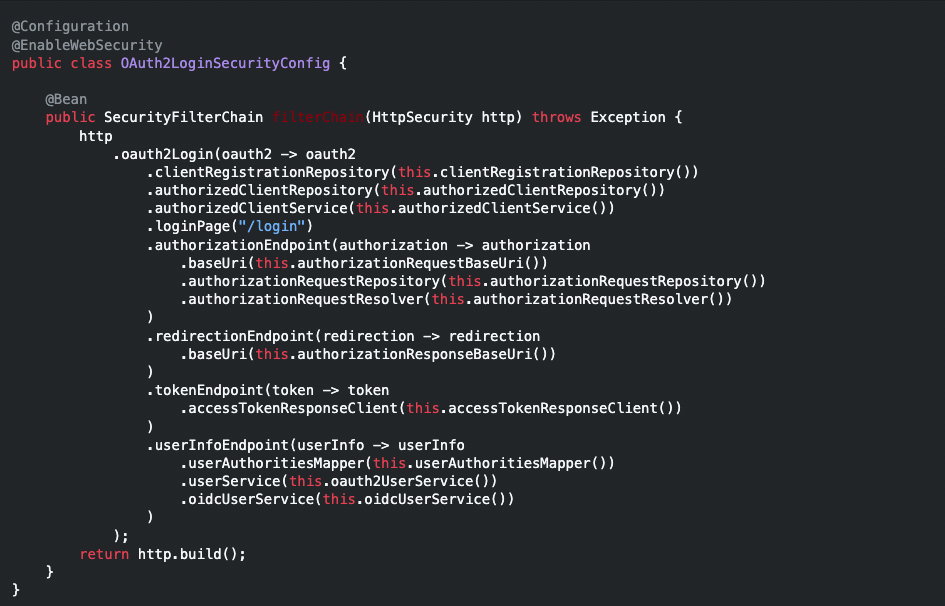
그외에도 더 많은 설정들을 다음과 같이 할 수 있다.

왠만한건 입맛에 맞게 조리가 가능하다는 말씀!
Kakao oauth2 로그인 적용하기
우선 카카오 로그인을 구현하려면 카카오 oauth2 서버로부터 키를 발급받아야한다. 카카오 개발자 홈에 들어가서 애플리케이션을 등록하도록 하자.
※ 주의사항 ※
이 예제는 정말 OAuth2 로그인 구현만을 위한 예제로 session이나 jwt 같은 것 들은 다ㅏㅏㅏ 생략한다. 실제로 서비스에 붙일거라면 이 예제 + 인증정보를 관리할 수단도 고려해야한다.
1-1. kakao oauth2 key 발급받기

내 애플리케이션 페이지에서 구현하는 애플리케이션을 등록하자. 등록을 마무리하면 다음과 같은 페이지로 넘어갈 수 있다.

앱 키 창에서 발급받은 키들을 확인할 수 있다. 여기서 REST API 키와 Admin 키를 사용할 것이다. 당연하게도 외부에 노출되지 않도록 주의하도록 하자.

카카오 로그인 페이지에서 카카오 로그인을 활성화한다.

앱에 대해서 비즈앱 등록을 하지 않으면 로그인을 했을 때 아래와 같이 닉네임과 프로필 사진만 얻을 수 있다. 더 많은 정보를 필요로 한다면 비즈앱 등록을 하면된다. 이때 사업자 번호가 없어도 일단 임의로 등록을 할 수 있으니 그냥 하면 된다.
현재 보여지고 있는 애플리케이션은 예제로 만든 애플리케이션이라 비즈앱을 등록하지 않았다. 최대한 간단쓰하게~~

redirect uri를 등록한다.

여기까지 하면 카카오 개발자 페이지에서 더 설정할 것은 없다. 자 이제 가장, 가ㅏㅏㅏㅏㅏㅏㅏㅏㅏ장 간단쓰 하게 kakao login을 구현해보자.
1-2. Security Filter Chain에 oauth2Login 등록
우선 security filter chain에 oauth2Login을 등록하자. 지금은 가장 간단한 버전이므로 내부 설정은 하나도 하지 않은채 기본값으로 둔다.
package org.san.oauth2practice.config;

import static org.springframework.security.config.Customizer.*;

import org.springframework.context.annotation.Bean;
import org.springframework.context.annotation.Configuration;
import org.springframework.security.config.annotation.web.builders.HttpSecurity;
import org.springframework.security.config.annotation.web.configuration.EnableWebSecurity;
import org.springframework.security.web.SecurityFilterChain;

@Configuration
@EnableWebSecurity
public class SecurityConfig {

    @Bean
    public SecurityFilterChain securityFilterChain(HttpSecurity http) throws Exception {
        http.authorizeHttpRequests(authorize -> authorize
            .anyRequest().authenticated());
        http.oauth2Login(withDefaults());
        return http.build();
    }

}
1-3. application.yml 에 registration 정보 등록
spring:
  security:
    oauth2:
      client:
        registration:
          kakao:
            client-id: ${KAKAO_CLIENT_ID} # REST API key
            client-secret: ${KAKAO_CLIENT_SECRET} # Admin key
            authorization-grant-type: authorization_code
            redirect-uri: http://localhost:8080/login/oauth2/code/kakao
            client-authentication-method: client_secret_post
            scope: profile_nickname
        provider:
          kakao:
            authorization-uri: https://kauth.kakao.com/oauth/authorize
            token-uri: https://kauth.kakao.com/oauth/token
            user-info-uri: https://kapi.kakao.com/v2/user/me
            user-name-attribute: id
이렇게만 하고 run → localhost:8080/login 으로 접속하면 spring security에서 아래와 같은 화면을 제공한다.

kakao 누르면 카카오 로그인을 할 수 있다. so easy

여기까지의 코드는 아래에 있다.
https://github.com/anso33/spring-oauth-practice/tree/1-simplest-oauth2
그렇지만 이게 끝은 아니다. OAuth2 로그인에 성공했을 때, 나의 서비스 내에서 처리할 로직을 구성해야한다.
위의 로직까지 따라왔다면 정말 OAuth2 제공 서버에 로그인 하기! 까지만 구현이 되어있다. 여기서 더 고려해야할 두가지가 있다. 1. 우리 서비스 내의 로그인 로직에 대한 처리, 2.우리 서비스 내의 로그인까지 성공했을 때 어떻게 처리할 지. DefaultOAuth2UserService와 AuthenticationSuccessHandler를 상속, 구현함으로서 세부적인 로직 추가가 가능하다.
2-1. Override DefaultOAuth2UserService
securityfilterchain에서 oauth2Login()을 아무 커스텀하지 않으면 oauth2-client에서 제공하는 DefaultOAuth2UserService에서 제공하는 loadUser라는 메서드를 통해서 로그인을 시도하게 된다. loadUser 메서드를 통해서 등록했던 oauth2 server의 uri로 요청을 보내어 최종적으로 로그인에 대한 응답을 반환한다.
oauth2로그인에 성공하여 사용자의 oauth resource를 받았을 때, 내 서비스의 사용자인지 확인하는 등의 로직을 거치고 싶다면 DefaultOAuth2UserService를 상속하여 loadUser를 overriding 하면된다. DefaultOAuth2UserService의 loadUser에 oauth2 server로 로그인 요청을 보내는 로직이 구현되어있으므로 이를 이용하여 로그인 요청을 보내도록 하고 반환값으로 받은 유저의 정보를 가지고 내 서비스 내의 로그인 처리를 마무리할 수 있다.
우리가 oauth2-client를 사용하면 oauth2 로그인을 쉽게 구현할 수 있는 이유가 바로 이 loadUser 메서드이다.
이 메서드 내부적으로 인증코드와 인증 토큰에 대한 모든 동작이 구현되어 있어 우리가 직접 아무 구현하지 않아도 여러 요청을 실행한 뒤 유저정보 결과만 예쁘게 뚝, 반환해준다.
다음시간에는 이 아이 없이 직접 구현해보도록 하자.
import java.util.List;
import java.util.Map;

import org.san.oauth2practice.repository.InMemoryUserRepository;
import org.springframework.security.core.authority.SimpleGrantedAuthority;
import org.springframework.security.oauth2.client.userinfo.DefaultOAuth2UserService;
import org.springframework.security.oauth2.client.userinfo.OAuth2UserRequest;
import org.springframework.security.oauth2.core.OAuth2AuthenticationException;
import org.springframework.security.oauth2.core.user.DefaultOAuth2User;
import org.springframework.security.oauth2.core.user.OAuth2User;
import org.springframework.stereotype.Service;

import lombok.RequiredArgsConstructor;
import lombok.extern.slf4j.Slf4j;

@Service
@Slf4j
@RequiredArgsConstructor
public class CustomOAuth2UserService extends DefaultOAuth2UserService {
    private final InMemoryUserRepository userRepository;

    @Override
    public OAuth2User loadUser(OAuth2UserRequest userRequest) throws OAuth2AuthenticationException {
        OAuth2User oauth2User = super.loadUser(userRequest);
        log.info("oAuth2User: {}", oauth2User);
        final Map<String, Object> attributes = oauth2User.getAttributes();
        final String oauthId = String.valueOf(attributes.get("id"));
        final String oauthType = userRequest.getClientRegistration().getRegistrationId();

        List<SimpleGrantedAuthority> authorities = List.of(new SimpleGrantedAuthority("ROLE_GUEST"));
        if (userRepository.findByOAuthIdAndOAuthType(oauthId, oauthType) != null) {
            // 로그인 ROLE_USER
            authorities = List.of(new SimpleGrantedAuthority("ROLE_USER"));
            return new DefaultOAuth2User(authorities, oauth2User.getAttributes(), "id");
        }
        // ROLE_GUEST
        return new DefaultOAuth2User(authorities, oauth2User.getAttributes(), "id");
    }
}
뭐 로그인한 시간을 업데이트 하는 로직을 넣을 수도 있고 /../
이렇게 만든 내 CustomService를 사용하려면 oauth2Login()에 등록해야한다.
package org.san.oauth2practice.config;

import org.san.oauth2practice.service.CustomOAuth2UserService;
import org.springframework.context.annotation.Bean;
import org.springframework.context.annotation.Configuration;
import org.springframework.security.config.annotation.web.builders.HttpSecurity;
import org.springframework.security.config.annotation.web.configuration.EnableWebSecurity;
import org.springframework.security.web.SecurityFilterChain;

import lombok.RequiredArgsConstructor;

@Configuration
@EnableWebSecurity
@RequiredArgsConstructor
public class SecurityConfig {
    private final CustomOAuth2UserService customOAuth2UserService;

    @Bean
    public SecurityFilterChain securityFilterChain(HttpSecurity http) throws Exception {
        http.authorizeHttpRequests(authorize -> authorize
            .anyRequest().authenticated());
        http.oauth2Login(config -> config
            .userInfoEndpoint(endpointConfig -> endpointConfig
                .userService(customOAuth2UserService)));

        return http.build();
    }

}
2-2 로그인에 성공했을 때 어떻게 처리할 것인지
oauth2로 받은 정보를 가지고 내 서비스 계정에 대해 로그인 성공했다면 로그인 성공했을 때의 로직을 구현해야한다. 로그인 성공! 끝! 은 아니니까..... 예를 들면 세션에 필요 정보를 담아 저장한다거나, 인증한 계정의 등급에 따라 다른 uri로 리다이렉트 한다거나, 가장 흔하게 JWT 토큰 발급 등등이 있겠다.
아래와 같이 AuthenticationSuccessHandler를 구현하여 OAuth2 인증 성공시의 로직을 구현할 수 있다.
import java.io.IOException;

import org.springframework.security.core.Authentication;
import org.springframework.security.web.authentication.AuthenticationSuccessHandler;
import org.springframework.stereotype.Component;

import jakarta.servlet.ServletException;
import jakarta.servlet.http.HttpServletRequest;
import jakarta.servlet.http.HttpServletResponse;

@Component
@Slf4j
public class CustomOAuth2SuccessHandler implements AuthenticationSuccessHandler {
    @Override
    public void onAuthenticationSuccess(HttpServletRequest request, HttpServletResponse response,
                                        Authentication authentication) throws IOException, ServletException {
        // 여기에 로그인 성공 후 처리할 내용을 작성하기!
        DefaultOAuth2User oAuth2User = (DefaultOAuth2User) authentication.getPrincipal();
        if (isUser(oAuth2User)) {
            response.sendRedirect("/access-user");
        } else {
            response.sendRedirect("/access-guest");
        }
    }

    private boolean isUser(DefaultOAuth2User oAuth2User) {
        return oAuth2User.getAuthorities().stream()
                .anyMatch(authority -> authority.getAuthority().equals("ROLE_USER"));
    }
}
구현한 handler는 역시 OAuth2Login configuration에 등록해야한다.
@Configuration
@EnableWebSecurity
@RequiredArgsConstructor
public class SecurityConfig {
    private final CustomOAuth2UserService customOAuth2UserService;
    private final CustomOAuth2SuccessHandler customOAuth2SuccessHandler;

    @Bean
    public SecurityFilterChain securityFilterChain(HttpSecurity http) throws Exception {
        http.authorizeHttpRequests(authorize -> authorize
            .anyRequest().authenticated());
        http.oauth2Login(config -> config
            .successHandler(customOAuth2SuccessHandler) ///////////
            .userInfoEndpoint(endpointConfig -> endpointConfig
                .userService(customOAuth2UserService)));

        return http.build();
    }

}
여기까지만 해도 http://localhost:8080/oauth2/authorization/kakao 에 접속하면 kakao 로그인이 뜨고, 로그인을 완료하면 다음과 같이 내가 success handler에 구현한 로직이 실행된다.

모든 시도에는 성공 케이스만 있을리가.... 실패했을 때는 어떻게 핸들링하지?
시도에는 성공만 있을리가.... 실패했을 때 어떻게 핸들링할지 구현해야한다. AuthenticationFailureHandler를 구현하고 해당 인터페이스의 메서드를 오버라이딩하면 된다.
import java.io.IOException;

import org.springframework.security.core.AuthenticationException;
import org.springframework.security.web.authentication.AuthenticationFailureHandler;
import org.springframework.stereotype.Component;

import jakarta.servlet.ServletException;
import jakarta.servlet.http.HttpServletRequest;
import jakarta.servlet.http.HttpServletResponse;

@Component
public class CustomAuthExceptionHandler implements AuthenticationFailureHandler {

    @Override
    public void onAuthenticationFailure(HttpServletRequest request, HttpServletResponse response,
        AuthenticationException exception) throws IOException, ServletException {
        // 여기에 로그인 실패 후 처리할 내용을 작성하기!
        response.sendRedirect("/login-failure");
    }
}
잊지말자. 내가 만든 무언가는 security configuration에 등록해야 security가 써준다.
@Configuration
@EnableWebSecurity
@RequiredArgsConstructor
public class SecurityConfig {
    private final CustomOAuth2UserService customOAuth2UserService;
    private final CustomOAuth2SuccessHandler customOAuth2SuccessHandler;
    private final CustomAuthExceptionHandler customAuthExceptionHandler;

    @Bean
    public SecurityFilterChain securityFilterChain(HttpSecurity http) throws Exception {
        http.authorizeHttpRequests(authorize -> authorize
            .anyRequest().authenticated());
        http.oauth2Login(config -> config
            .successHandler(customOAuth2SuccessHandler)
            .failureHandler(customAuthExceptionHandler)
            .userInfoEndpoint(endpointConfig -> endpointConfig
                .userService(customOAuth2UserService)));

        return http.build();
    }
}
가장 심플심플심플한 카카오 구현, 벌써 끝!!
여기까지의 코드는 여기 있다.
https://github.com/anso33/spring-oauth-practice/tree/2-simple-kakao-oauth2
Github OAuth2 로그인 구현하기
깃헙 로그인 고고우~씽~~

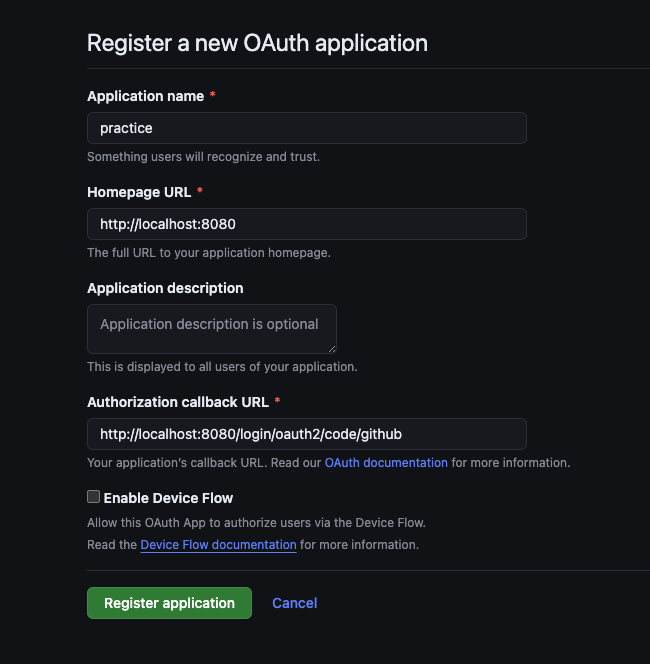
깃헙 Settings -> 우측 하단에 위치한 Developer Settings -> OAuth Apps에서 내 서비스를 등록하고 키를 발급받자.
github 킹받요소, redirect url 한번에 하나밖에 등록 못함..........ㅋㅋㅋ
그래서 서비스 만들때, local 연습용, dev 서버용, 운영 서버용 총 3개 만듬;;;ㅋㅋㅋㅋㅋ 근데 이거 말고 Github App 쓰면 아닌 것 같던데.. 잘 모르겠다. 이건 해보면 다시 쓸게용용

New OAuth App을 눌러서 나의 서비스를 등록해봅시다.

Homepage URL이 아직 안정해져있을 때는 아무거나 일단 쓰면 된다. 나중에 바꾸면 되용 돼용? 되용?

App 을 등록했을 때 나오는 client id, client secret을 application.yml 으로~
카카오 한번하고 깃헙을 하니까 너무 쉽다!
카카오 보다 깃헙은 0.1초일지라도 더 빨리 끝난다.
왜냐면 github에 대한 정보가 이미 oauth2-client에 저장되어 있기 때문!!!!!!!!
provider는 생략~
spring:
  security:
    oauth2:
      client:
        registration:
          kakao:
            client-id: ${KAKAO_CLIENT_ID} # REST API key
            client-secret: ${KAKAO_CLIENT_SECRET} # Admin key
            authorization-grant-type: authorization_code
            redirect-uri: http://localhost:8080/login/oauth2/code/kakao
            client-authentication-method: client_secret_post
            scope: profile_nickname
          github:
            client-name: github
            client-id: ${GITHUB_CLIENT_ID}
            client-secret: ${GITHUB_CLIENT_SECRET}
            redirect-uri: http://localhost:8080/login/oauth2/code/github
            scope: user:email
        provider:
          kakao:
            authorization-uri: https://kauth.kakao.com/oauth/authorize
            token-uri: https://kauth.kakao.com/oauth/token
            user-info-uri: https://kapi.kakao.com/v2/user/me
            user-name-attribute: id
이렇게만 했는데? 앞에서 카카오 로그인을 구현하면서 이미 OAuth2Service와 Success, Failure Handler를 구현했기 때문에 깃헙은 숟가락만 얹고도 다음과 같이 로그인 구현 완료다.

정말 누워서 눈알 굴리기만큼 쉽게 깃헙 로그인을 붙였는데
여기서 끝나면 좀 아쉽다.
왜냐하면 우리에겐 정말 읽기 싫어지는 코드 덩어리들이 남았기 때문이다. ㅎㅎ
(그리고 사실은 로그인만 성공했지, 로그인 성공해서 받은 유저 정보를 어떻게 가공할지는 아직 구현 안함ㅎㅎ)
구현도 빨리 끝났는데 확장성 있는 코드로 개선해보도록 합시다!
1. OAuth2 Provider 종류가 늘었으니 enum 으로 관리해주쟈
public enum OauthType {
    KAKAO("kakao"), GITHUB("github");

    private final String type;

    OauthType(String type) {
        this.type = type;
    }

	public static OauthType ofType(String type) {
        return Arrays.stream(values())
                .filter(oauthType -> oauthType.type.equals(type))
                .findFirst()
                .orElseThrow(() -> new IllegalArgumentException("No such OauthType"));
    }

    public String getType() {
        return type;
    }
}
2. OAuth2 Provider 마다 사용자의 정보를 내려주는 양식이 다르다. 따라서 loadUser를 통해 받은 사용자의 정보를 각 Provider에 맞게 파싱해서 가져가야한다.
각 OAuth2 제공 서버로부터 받은 유저 정보를 출력해보면 다음과 같이 제각각이다.
| oAuth2User: Name: [111111111], Granted Authorities: [ [OAUTH2_USER, SCOPE_profile_nickname] ], User Attributes: [{ id=11111111111, connected_at=2024-05-30T12:09:27Z, properties={nickname=이름}, kakao_account={ profile_nickname_needs_agreement=false, profile_image_needs_agreement=true, profile={nickname=이름, is_default_nickname=false} } }] |
oAuth2User: Name: [111111111], Granted Authorities: [ [OAUTH2_USER, SCOPE_user: email] ], User Attributes: [{ login = 깃헙 아이디, id = 111111111, node_id = assfdjkhskjf avatar_url = , gravatar_id=, ,,, |
여기서 내가 원하는 정보를 파싱하려면 OAuth2 제공 서버가 누구인지 파악하고 제공 서버에 맞게 각자 다른 방법으로 파싱해야한다.
그러다보면 다음과 같은 코드를 피할 수가 없다..... 두둥....
import lombok.RequiredArgsConstructor;
import lombok.extern.slf4j.Slf4j;
import org.san.oauth2practice.model.User.OauthType;
import org.san.oauth2practice.model.User.User;
import org.san.oauth2practice.repository.InMemoryUserRepository;
import org.springframework.security.core.authority.SimpleGrantedAuthority;
import org.springframework.security.oauth2.client.userinfo.DefaultOAuth2UserService;
import org.springframework.security.oauth2.client.userinfo.OAuth2UserRequest;
import org.springframework.security.oauth2.core.OAuth2AuthenticationException;
import org.springframework.security.oauth2.core.user.DefaultOAuth2User;
import org.springframework.security.oauth2.core.user.OAuth2User;
import org.springframework.stereotype.Service;

import java.util.List;
import java.util.Map;

@Service
@Slf4j
@RequiredArgsConstructor
public class CustomOAuth2UserService extends DefaultOAuth2UserService {
    private final InMemoryUserRepository userRepository;

    @Override
    public OAuth2User loadUser(OAuth2UserRequest userRequest) throws OAuth2AuthenticationException {
        OAuth2User oauth2User = super.loadUser(userRequest);
        log.info("oAuth2User: {}", oauth2User);
        final Map<String, Object> attributes = oauth2User.getAttributes();
        final String oauthType = userRequest.getClientRegistration().getRegistrationId();

        String oauthId = null;
        String oauthName = null;
        if (OauthType.KAKAO.getType().equals(oauthType)) {
            oauthId = String.valueOf(attributes.get("id"));
            oauthName = String.valueOf(((Map<String, Object>) attributes.get("properties")).get("nickname"));
        } else if (OauthType.GITHUB.getType().equals(oauthType)) {
            oauthId = String.valueOf(attributes.get("id"));
            oauthName = String.valueOf(attributes.get("name"));
        } else {
            throw new OAuth2AuthenticationException("Unsupported OAuth2 provider");
        }
        log.info("oauthId: {}, oauthName: {}", oauthId, oauthName);

        List<SimpleGrantedAuthority> authorities = List.of(new SimpleGrantedAuthority("ROLE_GUEST"));
        final User findUser = userRepository.findByOAuthIdAndOAuthType(oauthId, oauthType);
        if (findUser != null) {
            if (!findUser.getOauthId().equals(oauthId) && !findUser.getOauthType().equals(oauthType)) {
                throw new OAuth2AuthenticationException("oauth information not matched!");
            }
            // 로그인 ROLE_USER
            authorities = List.of(new SimpleGrantedAuthority("ROLE_USER"));
            return new DefaultOAuth2User(authorities, oauth2User.getAttributes(), "id");
        }
        // ROLE_GUEST
        return new DefaultOAuth2User(authorities, oauth2User.getAttributes(), "id");
    }
}
같은 동작을 하지만 그 동작을 하기 위해서는 구현 방식이 다른 코드들이 한 메서드 안에 뭉쳐있다.
그리고 조금 더 생각해보면 카카오의 로그아웃, 회원탈퇴, 깃헙의 로그아웃, 회원탈퇴.. 이렇게 같은 동작을 하지만 구현은 다르게 해야할 메서드들이 눈에 선하다. OAuth2 인증 과정 중에서 필요한 기능을 정의하고 OAuth2 제공 서버에게 맞춰 다르게 구현한 클래스를 두면, 지금처럼 OAuth2 제공 서버들의 모든 로직이 한 메서드 안에 들어갈 필요가 없을 것 같다.
아래와 같이 필요한 기능을 인터페이스로 정의해보자.
우선 이 클래스가 어떤 OAuth2 제공 서버에 대해서 구현한건지 알 수 있는 메서드와 OAuth2 제공 서버로부터 받은 정보에서 내가 원하는 유저 정보만 파싱할 메서드가 필요하다. 또 아마 앞으로는 회원 탈퇴를 위한 메서드도 필요할 것이다. (이건 나중에 필요할 때 명세를 추가하고 구현하면 된다.) 제공 서버마다 다르지 않고 공통되는 로직은 default 메서드로 인터페이스에 구현해놓고 가져다 쓸 수 있다.
import org.san.oauth2practice.model.User.OauthType;
import org.san.oauth2practice.service.OAuth2UserInfo;
import org.springframework.security.oauth2.core.OAuth2AuthenticationException;
import org.springframework.security.oauth2.core.user.OAuth2User;

public interface OAuth2Strategy {
    OauthType getOAuth2ProviderType();

    OAuth2UserInfo getUserInfo(OAuth2User user);

    // boolean unlinkOAuth2Account();

    default void isOauthIdExist(String oauthId) {
        if (null == oauthId) {
            throw new OAuth2AuthenticationException("oauthId does not exist");
        }
    }
}
이제 제공 서버에 맞게 인터페이스를 구현한 클래스를 두도록 하자.
import org.san.oauth2practice.model.User.OauthType;
import org.san.oauth2practice.service.OAuth2UserInfo;
import org.springframework.security.oauth2.core.user.OAuth2User;
import org.springframework.stereotype.Component;

import java.util.Map;

@Component
public class KakaoOAuth2Strategy implements OAuth2Strategy {

    @Override
    public OauthType getOAuth2ProviderType() {

        return OauthType.KAKAO;
    }

    @Override
    public OAuth2UserInfo getUserInfo(OAuth2User user) {
        final Map<String, Object> attributes = user.getAttributes();
        final String oauthId = String.valueOf(attributes.get("id"));
        final String oauthName = String.valueOf(((Map<String, Object>) attributes.get("properties")).get("nickname"));

        return new OAuth2UserInfo(OauthType.KAKAO, oauthId, oauthName);
    }
}
깃헙까지 킵고잉~ 코드는.... 생략하도록 하겠습니다..ㅎㅎㅎ
그럼 이제 아래와 같이 CustomOAuth2Service 의 loadUser 메서드를 다이어트 시킬 수 있다.
import lombok.RequiredArgsConstructor;
import lombok.extern.slf4j.Slf4j;
import org.san.oauth2practice.model.User.OauthType;
import org.san.oauth2practice.model.User.User;
import org.san.oauth2practice.repository.InMemoryUserRepository;
import org.san.oauth2practice.service.strategy.GithubOAuth2Strategy;
import org.san.oauth2practice.service.strategy.KakaoOAuth2Strategy;
import org.springframework.security.core.authority.SimpleGrantedAuthority;
import org.springframework.security.oauth2.client.userinfo.DefaultOAuth2UserService;
import org.springframework.security.oauth2.client.userinfo.OAuth2UserRequest;
import org.springframework.security.oauth2.core.OAuth2AuthenticationException;
import org.springframework.security.oauth2.core.user.DefaultOAuth2User;
import org.springframework.security.oauth2.core.user.OAuth2User;
import org.springframework.stereotype.Service;

import java.util.List;

@Service
@Slf4j
@RequiredArgsConstructor
public class CustomOAuth2UserService extends DefaultOAuth2UserService {
    private final InMemoryUserRepository userRepository;
    private final KakaoOAuth2Strategy kakaoOAuth2Strategy;
    private final GithubOAuth2Strategy githubOAuth2Strategy;

    @Override
    public OAuth2User loadUser(OAuth2UserRequest userRequest) throws OAuth2AuthenticationException {
        OAuth2User oauth2User = super.loadUser(userRequest);

        final String oauthType = userRequest.getClientRegistration().getRegistrationId();
        OAuth2UserInfo oauth2UserInfo = null;
        if (OauthType.KAKAO.getType().equals(oauthType)) {
            oauth2UserInfo = kakaoOAuth2Strategy.getUserInfo(oauth2User);
        } else if (OauthType.GITHUB.getType().equals(oauthType)) {
            oauth2UserInfo = githubOAuth2Strategy.getUserInfo(oauth2User);
        } else {
            throw new OAuth2AuthenticationException("Unsupported OAuth2 provider");
        }

        List<SimpleGrantedAuthority> authorities = getAuthorities(oauth2UserInfo);

        return new DefaultOAuth2User(authorities, oauth2User.getAttributes(), "id");
    }

    private List<SimpleGrantedAuthority> getAuthorities(OAuth2UserInfo userInfo) {
        final User findUser = userRepository.findByOAuthIdAndOAuthType(userInfo.getOauthId(), userInfo.getOauthType());
        if (findUser != null) {
            if (!findUser.getOauthId().equals(userInfo.getOauthId()) && !findUser.getOauthType().equals(userInfo.getOauthType())) {
                throw new OAuth2AuthenticationException("oauth information not matched!");
            }
            // 로그인 ROLE_USER
            return List.of(new SimpleGrantedAuthority("ROLE_USER"));
        }

        return List.of(new SimpleGrantedAuthority("ROLE_GUEST"));
    }
}
하지만 아직 만족스럽지 않다. .... oauth2 타입이 또 늘어나면.... else if 가 덕지덕지 될 코드...
StrategyFactory를 만들면 내가 필요한 전략을 맵에서 꺼내쓸 수 있어 if 문으로 분기를 안태워도 될 것 같다. 하지만 StrategyFactory는 서비스에 OAuth2 제공 서버의 종류가 늘어나면 직접 Factory에 전략을 등록하는 코드를 추가해줘야한다. 더 좋은 방법을....!
전략 클래스를 추가하기만 해도 알아서 읽어다가 내가 필요한 전략을 꺼내줬으면 좋겠다.
import org.san.oauth2practice.model.User.OauthType;
import org.san.oauth2practice.service.strategy.OAuth2Strategy;
import org.springframework.security.oauth2.core.OAuth2AuthenticationException;
import org.springframework.stereotype.Component;

import java.util.Map;
import java.util.Optional;
import java.util.Set;

import static java.util.function.UnaryOperator.identity;
import static java.util.stream.Collectors.toMap;

@Component
public class OAuth2StrategyComposite {
    private final Map<OauthType, OAuth2Strategy> oauth2ProviderMap;

    public OAuth2StrategyComposite(Set<OAuth2Strategy> clients) {
        this.oauth2ProviderMap = clients.stream()
                .collect(toMap(OAuth2Strategy::getOAuth2ProviderType, identity()));
    }

    public OAuth2Strategy getOAuth2Strategy(OauthType provider) {
        return Optional.ofNullable(oauth2ProviderMap.get(provider))
                .orElseThrow(() -> new OAuth2AuthenticationException("not supported OAuth2 provider"));
    }
}
Strategy 클래스는 매번 새로 생성할 필요가 없어 Bean으로 띄워두고 있다. 이런 점을 이용하여 다음과 같이 생성자의 파라미터를 두면 스프링의 생성자 기반 의존성 주입에 의해 스프링이 관리하고 있는 모든 OAuth2Strategy 구현 클래스의 집합을 받을 수 있다.
이 집합을 이용하여 전략 클래스들을 관리할 맵을 만들어 놓고 아래와 같이 사용해보자.
import lombok.RequiredArgsConstructor;
import lombok.extern.slf4j.Slf4j;
import org.san.oauth2practice.model.User.OauthType;
import org.san.oauth2practice.model.User.User;
import org.san.oauth2practice.repository.InMemoryUserRepository;
import org.springframework.security.core.authority.SimpleGrantedAuthority;
import org.springframework.security.oauth2.client.userinfo.DefaultOAuth2UserService;
import org.springframework.security.oauth2.client.userinfo.OAuth2UserRequest;
import org.springframework.security.oauth2.core.OAuth2AuthenticationException;
import org.springframework.security.oauth2.core.user.DefaultOAuth2User;
import org.springframework.security.oauth2.core.user.OAuth2User;
import org.springframework.stereotype.Service;

import java.util.List;

@Service
@Slf4j
@RequiredArgsConstructor
public class CustomOAuth2UserService extends DefaultOAuth2UserService {
    private final InMemoryUserRepository userRepository;
    private final OAuth2StrategyComposite oauth2StrategyComposite;

    @Override
    public OAuth2User loadUser(OAuth2UserRequest userRequest) throws OAuth2AuthenticationException {
        OAuth2User oauth2User = super.loadUser(userRequest);
        OAuth2UserInfo oauth2UserInfo = oauth2StrategyComposite
                .getOAuth2Strategy(getSocialProvider(userRequest))
                .getUserInfo(oauth2User);
        List<SimpleGrantedAuthority> authorities = getAuthorities(oauth2UserInfo);

        return new DefaultOAuth2User(authorities, oauth2User.getAttributes(), "id");
    }

    private OauthType getSocialProvider(OAuth2UserRequest userRequest) {
        return OauthType.ofType(userRequest.getClientRegistration().getRegistrationId());
    }

    private List<SimpleGrantedAuthority> getAuthorities(OAuth2UserInfo userInfo) {
        final User findUser = userRepository.findByOAuthIdAndOAuthType(userInfo.getOauthId(), userInfo.getOauthType());
        if (findUser != null) {
            if (!findUser.getOauthId().equals(userInfo.getOauthId()) && !findUser.getOauthType().equals(userInfo.getOauthType())) {
                throw new OAuth2AuthenticationException("oauth information not matched!");
            }
            // 로그인 ROLE_USER
            return List.of(new SimpleGrantedAuthority("ROLE_USER"));
        }

        return List.of(new SimpleGrantedAuthority("ROLE_GUEST"));
    }
}
아~ 깔끔해졌다! 이제 OAuth2를 추가해도 Strategy 클래스만 새로 구현하면 될 뿐! 다른 클래스는 수정할 필요가 없어졌다 ><
쓰다보니 엄청 길어졌는데... 여기까지 읽어주셔서 감사합니다~ (급 마무리)
참 그리고 또또 여기까지 구현한 코드는 여기에...
https://github.com/anso33/spring-oauth-practice/tree/3-simple-github-oauth2
[ 참고 자료 ]
https://docs.spring.io/spring-security/reference/servlet/oauth2/client/index.html
https://github.com/anso33/spring-oauth-practice/tree/3-simple-github-oauth2
'Spring | SpringBoot' 카테고리의 다른 글
| [스프링 스터디] 2주차. JPA (0) | 2022.05.07 |
|---|---|
| [스프링 스터디] 1주차. 단위테스트, 롬복 (0) | 2022.05.07 |
| [스프링 스터디] 7주차 - 스프링 핵심 원리.기본편 (마지막) (0) | 2022.02.24 |
| [스프링 스터디] 6주차 - 스프링 핵심 원리.기본편 (0) | 2022.02.17 |
| [스프링 스터디] 5주차 - 스프링 핵심 원리.기본편 (0) | 2022.02.10 |


댓글